
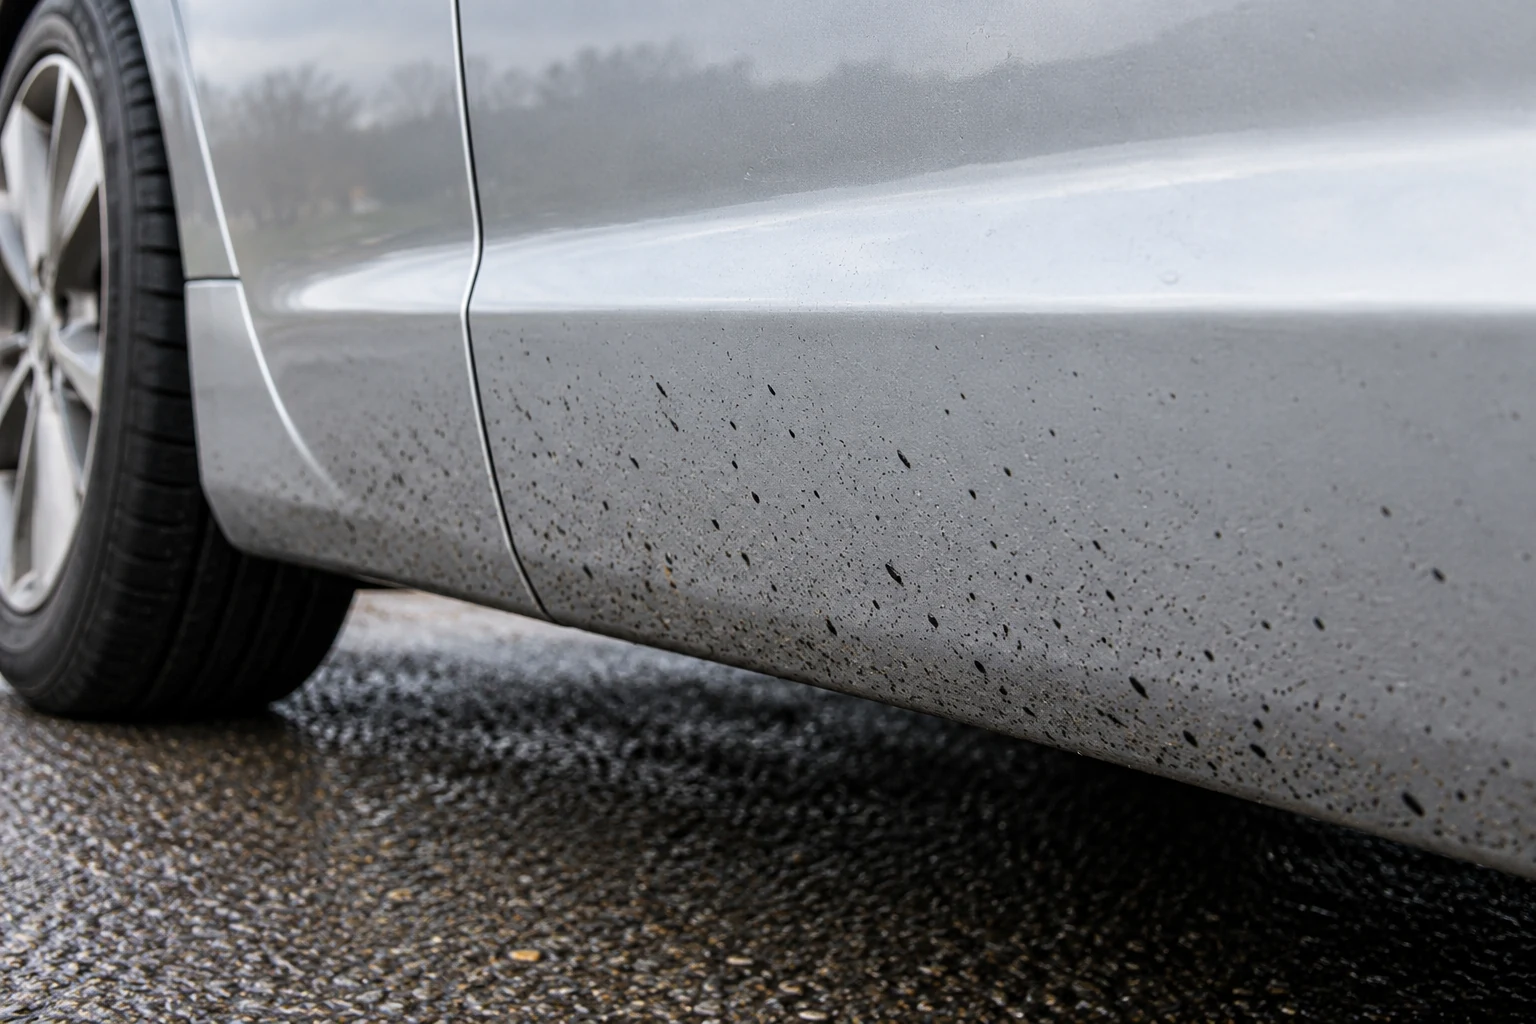
Check that the spot is actually a removable deposit
Tar often appears as dark specks on lower panels after road use, but colour and location alone do not prove the diagnosis. Road film, adhesive, iron-bearing contamination and a defect in the paint can all be mistaken for a stubborn dark mark. Start with a compatible wash and inspect what remains.
Do not pick at the spot to establish whether it is raised. Use good light and a restrained inspection of clean paint. If the mark is associated with lifting lacquer, a chip, film damage or an uncertain repair, stop and ask for advice before applying solvent.
This guide covers targeted bodywork treatment. It does not transfer a paint recommendation to tyres, wheel finishes, interior trim or every external plastic on the car.
Prepare the product, cloth and finishing step together
Read the exact tar-remover directions before opening the bottle. Have the specified clean cloth and any required rinse or wash equipment ready. Choose conditions in which the product can be used and removed comfortably, without hot panels or direct sun where excluded.
Map the surrounding materials: rubber seals, textured plastics, badges, film edges and repaired sections can sit close to an apparently ordinary painted area. Cloth transfer can reach them even when you avoid spraying directly. If the product cannot be controlled within its permitted surface, select another approved route.
| Product | Method to follow | Material boundary |
|---|---|---|
| Autoglym Intensive Tar Remover | Clean cotton-cloth exterior method, stated contact interval and wipe or wash removal | Test the actual finish; do not turn broad promotional language into universal material approval |
| Gtechniq W7 | Spray a suitable cloth, discreet compatibility test, controlled treatment and clean-cloth residue removal | Exclude plastics, rubber, vinyl, PPF, smart repairs and wraps |
Step 1: wash loose dirt away
A solvent spot treatment should not become a way to wipe a gritty lower panel without washing. Rinse and contact-wash through the suitable routine first. Remove wash residue and establish the starting condition specified by the chosen cleaner.
Keep the bodywork tools clear of wheel dirt. Do not use a cloth that has already wiped brake dust or tyre dressing simply because the tar spot is near a wheel arch. A tool’s previous contamination matters more than its colour or apparent softness.
If several kinds of deposit remain, identify the most relevant treatment rather than applying multiple chemicals together. Tar remover and iron remover perform different jobs; complete and remove one stage before any other permitted process.
Step 2: follow a controlled Autoglym method
Autoglym Intensive Tar Remover’s exterior directions use a clean cotton cloth to apply product to tar spots. The stated contact period is one to two minutes, followed by wiping or washing away the loosened material. Use the directions on the received version and test suitability before extending treatment.
The aim is for the deposit to soften and release through the supported method. Avoid scrubbing simply because a spot has begun to dissolve. Change to a clean working face as residue transfers, so you do not spread dissolved tar across a wider area.
For targeted tar spots with a cloth method
Autoglym Intensive Tar Remover 500ml
A dedicated tar-removal liquid for suitable paintwork. The exterior method uses a clean cotton cloth and a one-to-two-minute contact period before wiping or washing away the loosened residue.
- 500ml liquid
- Clean cotton-cloth method
- One-to-two-minute exterior contact
Use the received directions and test compatibility. It can remove wax; do not infer suitability for every repair, film or plastic. The maker’s FAQ excludes interior plastics despite broader promotional wording.
Its capability to remove wax also matters after cleaning. A local protection top-up may be appropriate, but only after the residue is fully removed and the next product’s surface preparation is satisfied. Do not immediately layer protection over a solvent-wet patch.
Step 3: keep W7 within its narrower limits
Gtechniq W7 is an alternative for suitable paint with an explicitly cloth-first method. The maker directs testing an inconspicuous area before continuing, then removing all residue with a clean suitable cloth. Its compatibility with Gtechniq coatings is useful only within the product’s other restrictions.
Do not allow contact with plastics, rubber or vinyl. It is not suitable for PPF, smart repairs or wrapped vehicles. Those limits can rule out a job even when the visible spot sits on an otherwise glossy panel.
For compatible paint with a controlled cloth-first method
Gtechniq W7 Tar and Glue Remover 500ml
A full-strength solvent-based remover for tar and glue, compatible with Gtechniq’s coating range. The maker directs spraying a suitable cloth, testing discreetly and wiping away all residue with a clean cloth.
- 500ml bottle
- Cloth-first application
- Gtechniq coating compatibility
Exclude plastics, rubber, vinyl, PPF, smart repairs and wrapped vehicles. Work out of direct sunlight in a well-ventilated area with the protection specified by the label. Coating compatibility does not override these exclusions.
If a lower bumper has had an unknown repair, establish what was done rather than inferring suitability from a colour match. A successful test elsewhere cannot approve an explicitly excluded repair or adjacent material.
Step 4: remove the softened load and residue
Use the product’s prescribed removal process, with clean tools and light controlled movement. Keep track of which cloth faces have collected dissolved tar. Do not use the contaminated face for final buffing or put it back in the drying-towel box.
Complete any instructed wash or rinse. Where the finish or cleaner requires a particular cleanup, follow that instead of improvising another solvent to remove the first. Chemical mixtures and sequential wet layers are not established by two separate suitability claims.
If spots remain, assess whether the label permits another application and whether the surface remains sound. Persistent deposits may need a different diagnosis or professional treatment. Do not extend contact indefinitely or move to a stronger household solvent.
Step 5: inspect before protecting
Once the area is appropriately clean and dry, inspect the result under useful light. A stain, outline or defect remaining after the raised material has gone is a separate issue. Repeated solvent wiping will not replace missing paint or establish whether correction is appropriate.
Check the next protective product’s preparation requirements and the existing coating’s care. A whole-car correction or claying session is not compulsory after a few local tar spots. Use the least intrusive suitable next step.
Reset the tools and avoid repeating the problem
Segregate used chemical cloths from ordinary drying and glass textiles. Follow the cleaner’s label, textile care and disposal guidance rather than assuming every solvent-loaded cloth belongs in the next mixed wash. Store bottles closed and identifiable as directed.
Tar deposition depends partly on roads and conditions, so no wash interval prevents every spot. Inspect lower panels after a normal clean and address identified contamination through a controlled local method. The buying guide helps choose by restrictions before the next purchase.
Common questions
Can I scrape tar spots off with a fingernail?
Avoid picking or scraping them from paint. Soften suitable deposits with an approved tar-removal product and its specified cloth or application method. Hard mechanical removal can mark the finish or disturb a damaged edge.
Should tar remover go on a dry or wet car?
Follow the exact product instructions rather than one universal rule. Begin with clean paint so loose dirt is not dragged through the treatment. Check the required starting condition, application tool and removal step for the bottle you own.
Can Gtechniq W7 be used on PPF or a repaired bumper?
Gtechniq excludes PPF, smart repairs and wrapped vehicles, as well as plastics, rubber and vinyl. Do not use its coating-compatibility claim to override those exclusions or assume that an unidentified repair is suitable.
Does tar remover remove wax?
Some formulas can remove or reduce protective products. Autoglym explicitly describes wax removal among Intensive Tar Remover’s uses. After cleaning, assess the protection and follow an appropriate supported reapplication method if needed.
Do I need to clay the car after removing tar?
Not automatically. Inspect clean paint after the chemical and residue-removal steps. Mechanical decontamination is a separate decision for suitable remaining bonded contamination, with its own lubrication and marring risks.
Sources and product instructions
Follow the label and care instructions for the exact version and surface you own.